



4.Sindy Program Interface
4.1.Main Program Windows and Dialogs
Sindy is a window-based application designed to run in Microsoft Windows. The program is based on the MDI (Multiple Document Interface) standard and, in accordance with this standard, has one main window displayed immediately after the program starts. While working with the main window, multiple child windows can be created in which tests are run (or testing is performed). In other words, several tests can be run simultaneously, each in a separate MDI window.
In addition, while working with Sindy, additional dialog windows providing extended functions are sometimes opened. The program includes the following most important dialog windows:
A number of other windows are also implemented for various program functions. In particular, these include the project management windows and the Test Builder.
In addition to dialog windows, there are confirmation dialogs for particular actions:
- Dialog “Confirm saving project”
- Dialog “Confirm deleting object”
- “Confirm deleting child objects” dialog
- “Confirm updating project file” dialog
4.1.1.Main and Child Program Windows
The main window provides access to all program functions. It includes the following key areas:
- Control panel, which includes the main menu and configurable toolbar
- Test Builder — the left vertical panel of the program, displaying a tree of nodes containing test objects
- Test Player — the right-hand area in which MDI child windows for running tests appear
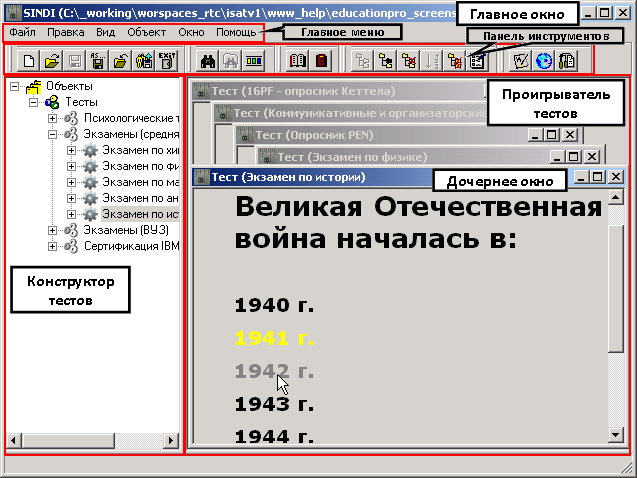
The control panel provides access to the various Sindy functions.
The Test Builder is the primary means of accessing test data and adding new data, as well as modifying and deleting existing data. All data in the Test Builder is displayed hierarchically as nodes, most of which represent various test objects. The hierarchy of test objects is built according to predefined architectural rules.
To populate the Test Builder correctly, you can use such graphical user interface elements as the main and context menus, as well as the toolbar. Keep in mind that when nodes of different types are activated in the Test Builder, the visibility and availability of various interface elements may change.
A test created with the Test Builder can be launched in the Test Player as a separate child window.
Remember that any test in the Test Builder can be launched in the Test Player only once at any particular time. At the same time, any number of different tests can be running simultaneously.
In some cases, it may be useful to expand the child window of a running test to full screen, which makes it possible to eliminate the influence of unrelated elements on the testing process. Note that no more than one child window can be displayed full screen at any one time. To expand the child window of another test, first restore the previously expanded window to the application level and then expand the other one.
4.1.2.“Toolbar Settings” Window
The “Toolbar Settings” window can be opened from the main window using the menu “Edit → Toolbars → Toolbar Settings”.
This window is used to change the visibility of individual toolbar groups in Sindy.
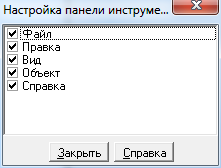
A check mark before the name of a toolbar group means that the group is visible and its buttons can be used to invoke Sindy functions. To hide a group, simply click the check mark with the left mouse button so that it disappears.
Five toolbar groups are available in the program, duplicating some of the functions of the main menu:
- File
- Edit
- View
- Object
- Help
To exit the “Toolbar Settings” window, click “Close”.
4.1.3.“About” Window
The “About” window can be opened using the menu “Help → About”.
This window provides additional information about Sindy, including the full release number, links to the LeDiS Group website, a link for sending an email to Technical Support, and other information.
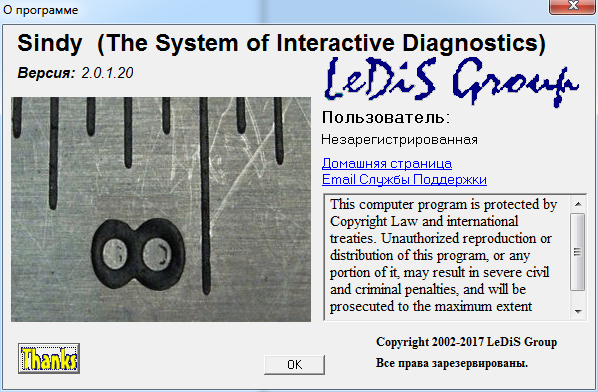
To open the developer’s website in a browser, left-click the “Home Page” link. To open the default email program and send an email to LeDiS Group Technical Support, left-click the “Support Email” link.
Clicking the “Thanks” button opens the auxiliary “Acknowledgements” window, listing third-party components and software used in the development of Sindy.
Click OK to close this window.
4.1.4.“Confirm Saving Project” Dialog
This confirmation dialog opens when a project containing unsaved changes is closed. For example, this occurs when you try to exit the program while a project in which test objects have been modified is still open.
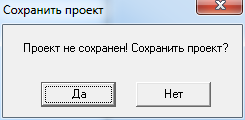
To confirm saving the project to the project file, click “Yes”; to discard changes made since the previous save or since the project was opened, click “No”. In both cases the project will be closed.
4.1.5.“Confirm Deleting Object” Dialog
This dialog opens when any test element is deleted using the main menu “Object → Delete ...” or the corresponding context menu in the Test Builder. For example, when deleting a test group using the “Delete test group” context menu command, the program asks you to confirm the operation.
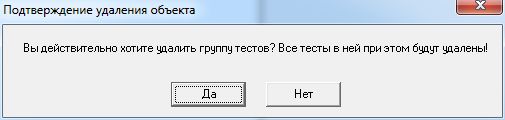
The exact message displayed in this dialog depends on the type of test element being deleted. Accordingly, a similar window also appears to confirm deletion of a test, question, answer, weight, scale, or interpretation.
To confirm deletion of the test object from the project, click “Yes”; to cancel deletion, click “No”.
4.1.6.“Confirm Deleting Child Objects” Dialog
This dialog opens when all child objects of any test object are deleted using the main menu “Object → Delete all ...” or the corresponding context menu in the Test Builder. The parent test object itself remains unchanged.
For example, this can be used to delete all tests from a test group using the “Delete all tests” context menu command. The program asks you to confirm this operation.
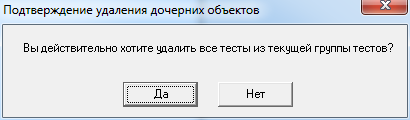
The exact message displayed in this dialog depends on the type of selected object whose child objects are being deleted.
To confirm deletion of the child objects from the project, click “Yes”; to cancel deletion, click “No”.
4.1.7.“Confirm Updating Project File” Dialog
This dialog opens when a project file created in an older version of Sindy is opened.
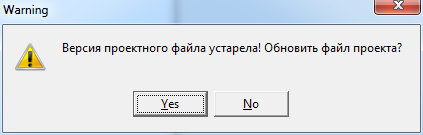
Once confirmed, this operation cannot be undone and the project file will be updated. Therefore, when this window appears with a prompt to update the project file, it is strongly recommended to immediately make a copy of the file being opened using the standard operating-system functions and only then confirm the update.
To confirm updating the project file, click “Yes”; to cancel, click “No”.
4.2.Main Menu
The Sindy main menu includes the following groups: “File”, “Edit”, “View”, “Object”, “Window”, and “Help”. Clicking a menu group heading opens its contents, which consist of various menu items, each associated with a predefined program function.
The “File” group of the main menu combines general project management operations, test import/export, and exiting the program.
Table 2. Main menu items in the “File” group
| Menu item | Description |
| New | Create a new empty project. |
| Open | Open a project saved in a project file. |
| Save | Save the open project to the current project file. This menu item is available only if changes have been made to the project currently open in the program using the Test Builder. |
| Save As… | Save the open project to a new project file, which will be created or replaced. This menu item is available only when a project is open. |
| Close | Close the project currently open in the program. This menu item is available only when a project is open. |
| Import Test... | Import a test into the project from EDT-format files. This menu item is available only when a project is open. |
| Export Test... | Export a test to an EDT-format file. The test is selected in an additional dialog window. This menu item is available only when a project is open. |
| Exit | Exit the program. |
The “Edit” group of the main menu includes operations for searching for test objects in the Test Builder, copying and pasting via the Windows Clipboard, and toolbar settings.
Table 3. Main menu items in the “Edit” group
| Menu item | Description |
| Find… | Find a node in the Test Builder node tree by specifying search criteria. This menu item is available only when a project is open. |
| Find Next | Find the next node in the Test Builder using the previous search criteria. This menu item is available only when a project is open and only if a search with specified criteria has already been performed. |
| Cut | Cut a test object to the Windows Clipboard for subsequent insertion elsewhere in the Test Builder. This menu item is available only when a project is open and only if a test group, test, question, answer, weight, scale, or interpretation object is selected. |
| Copy | Copy a test object to the Windows Clipboard for subsequent insertion elsewhere in the Test Builder. This menu item is available only when a project is open and only if a test group, test, question, answer, weight, scale, or interpretation object is selected. |
| Paste | Paste a test object if it was previously cut or copied to the Windows Clipboard. This menu item is available only when a project is open and only if an appropriate object is selected in the Test Builder (for example, a test can be pasted only into a test group, etc.). |
| Toolbars | Control the visibility of individual toolbars. |
The “View” group of the main menu includes operations for expanding and collapsing the hierarchical tree structure in the Test Builder. All items in this menu are available only when a project is open.
Table 4. Main menu items in the “View” group
| Menu item | Description |
| Show All Child Objects | Recursively expand all objects in the Test Builder for the selected node. |
| Hide All Child Objects | Recursively collapse all objects in the Test Builder for the selected node. |
The “Object” group of the main menu combines basic operations for constructing and launching tests, as well as arranging test elements. All items in this menu are available only when a project is open.
Table 5. Main menu items in the “Object” group
| Menu item | Description |
| Create | Create a new test object in the Test Builder as a child of the selected object. The name and availability of this menu item are determined by the type of the selected node. |
| Edit | Edit an existing test object represented by the selected node in the Test Builder. The name and availability of this menu item are determined by the type of the selected node. |
| Delete | Delete an existing test object represented by the selected node in the Test Builder. The name and availability of this menu item are determined by the type of the selected node. |
| Arrange “objects”… | Change the order of test objects in the Test Builder that are children of the selected node object. The name and availability of this menu item are determined by the type of the selected node. |
| Delete all “child objects” | Delete all test objects in the Test Builder that are children of the selected node element. The name and availability of this menu item are determined by the type of the selected node. |
| Run Test | Run a test in a child window of the Test Player. This menu item is available if any test is currently selected in the Test Builder. |
The “Window” group of the main menu includes operations for arranging and switching between child windows of the Test Player.
Table 6. Main menu items in the “Window” group
| Menu item | Description |
| Cascade | Arrange all existing Test Player child windows in a cascade. |
| Tile | Arrange all existing Test Player child windows as tiles. |
The “Help” group of the main menu provides access to help and additional information and makes it possible to contact Technical Support by email.
Table 7. Main menu items in the “Help” group
| Menu item | Description |
| Help… | Open online help documentation in the default web browser. |
| Home Page | Open the LeDiS Group website, the developer of Sindy, in the default web browser. |
| Email Technical Support | Open the email program with the email address of the Sindy developer’s Technical Support service specified. |
| About… | Open an additional window containing information about the program version, developer details, and other information related to Sindy. |
4.3.Toolbar
The Sindy toolbar consists of movable auxiliary panels with buttons and provides quick access to the program’s main functions. For convenience, toolbar buttons have unique icons and tooltips that make it easy to understand their function.
The toolbar structure largely mirrors the structure of the main menu. The toolbar is likewise divided into similar groups: “File”, “Edit”, “View”, “Object”, and “Help”.
The “File” toolbar group combines general project management operations, test import/export, and exiting the program.
Table 8. Toolbar items in the “File” group
| Toolbar button | Icon | Description |
| Create Project |  |
Create a new empty project. |
| Open Project |  |
Open a project saved in a project file. |
| Save Project |  |
Save the open project to the current project file. This toolbar button is available only if changes have been made to the project currently open in the program using the Test Builder. |
| Save Project As… |  |
Save the open project to a new project file, which will be created or replaced. This toolbar button is available only if a project is open in the program. |
| Close Project |  |
Close the project currently open in the program. This toolbar button is available only when a project is open. |
| Import Test from File |  |
Import tests into the project from specially prepared XML files. This toolbar button is available only when a project is open. |
| Export Test to File |  |
Export a test to an EDT-format file. The test is selected in an additional dialog window. This toolbar button is available only when a project is open. |
| Exit |  |
Exit the program. |
The “Edit” toolbar group includes operations for searching for test objects in the Test Builder and configuring the toolbar.
Table 9. Toolbar items in the “Edit” group
| Toolbar button | Icon | Description |
| Find… |  |
Find a node in the Test Builder node tree by specifying search criteria. This toolbar button is available only when a project is open. |
| Find Next |  |
Find the next node in the Test Builder using the previous search criteria. This toolbar button is available only when a project is open and only if a search with specified criteria has already been performed. |
| Toolbars |  |
Control the visibility of individual toolbars. |
The “View” toolbar group includes operations for expanding and collapsing the hierarchical tree structure in the Test Builder. All items in this menu are available only when a project is open.
Table 10. Toolbar items in the “View” group
| Toolbar button | Icon | Description |
| Show All Child Objects |  |
Recursively expand all objects in the Test Builder. |
| Hide All Child Objects |  |
Recursively collapse all objects in the Test Builder. |
The “Object” toolbar group combines basic operations for constructing and launching tests, as well as arranging test elements. All items in this menu are available only when a project is open.
Table 11. Toolbar items in the “Object” group
| Toolbar button | Icon | Description |
| Create |  |
Create a new test object in the Test Builder as a child of the selected object. The name and availability of this menu item are determined by the type of the selected node. |
| Edit |  |
Edit an existing test object represented by the selected node in the Test Builder. The name and availability of this menu item are determined by the type of the selected node. |
| Delete |  |
Delete an existing test object represented by the selected node in the Test Builder. The name and availability of this menu item are determined by the type of the selected node. |
| Arrange Objects… |  |
Change the order of test objects in the Test Builder that are children of the selected node object. The name and availability of this menu item are determined by the type of the selected node. |
| Delete All “Child Objects” |  |
Delete all test objects in the Test Builder that are children of the selected node element. The name and availability of this menu item are determined by the type of the selected node. |
| Run Test |  |
Run a test in a child window of the Test Player. This menu item is available if any test is currently selected in the Test Builder. |
The “Help” toolbar group provides access to help and additional information and makes it possible to contact Technical Support by email.
Table 12. Toolbar items in the “Help” group
| Toolbar button | Icon | Description |
| Help… |  |
Open online help documentation in the default web browser. |
| Home Page |  |
Open the LeDiS Group website, the developer of Sindy, in the default web browser. |
| Email Support |  |
Open the email program with the email address of the Sindy developer’s Technical Support service specified. |
4.4.Keyboard Shortcuts
Keyboard shortcuts partially duplicate menu items and make it possible to invoke the program’s main functions more quickly. Their only disadvantage is the need to remember the predefined key combinations assigned to these functions.
Sindy keyboard shortcuts can also be divided into groups: shortcuts for the main window, shortcuts for the Test Builder, and shortcuts for the Test Player.
Main-window keyboard shortcuts are standard for Microsoft Windows operating systems.
Table 13. Main-window keyboard shortcuts
| Keyboard shortcut | Action | Description |
| ALT-F4 | Press the ALT and F4 keys simultaneously | Exit Sindy by closing the application’s main window. If the program is closed while a project containing unsaved changes is open, you will additionally be prompted to save them. If tests are currently running in the program, you will be prompted to terminate testing for each of them. |
| CTRL-N | Press the CTRL and C keys simultaneously | Create a new empty project. |
| CTRL-E | Press the CTRL and E keys simultaneously | This key combination performs exactly the same action as the ALT-F4 keyboard shortcut. |
| CTRL-F | Press the CTRL and F keys simultaneously | Find a node in the Test Builder node tree by specifying search criteria. This key combination is available only when a project is open. |
| CTRL-I | Press the CTRL and I keys simultaneously | Import a test into the project from EDT-format files. This key combination is available only when a project is open. |
| CTRL-O | Press the CTRL and O keys simultaneously | Open a project saved in a project file. |
| CTRL-S | Press the CTRL and S keys simultaneously | Save the open project to the current project file. This key combination is available only if changes have been made to the project currently open in the program using the Test Builder. |
| F3 | Press the F3 key | Find the next node in the Test Builder using the previous search criteria. This key is available only when a project is open and only if a search with specified criteria has already been performed. |
| TAB | Press the keyboard Tab key | Move between graphical user interface elements in Sindy. |
Test Builder keyboard shortcuts make it possible to modify user data of test objects in open projects. This type of keyboard shortcut works only when one of the nodes in the Test Builder is selected.
Table 14. Test Builder keyboard shortcuts
| “Keyboard shortcut” | Action | Description |
| CTRL-ALT-S | Press the CTRL, ALT, and S keys simultaneously | Recursively expand all objects in the Test Builder for the selected node. |
| CTRL-ALT-H | Press the CTRL, ALT, and H keys simultaneously | Recursively collapse all objects in the Test Builder for the selected node. |
| CTRL-C | Press the CTRL and C keys simultaneously | Copy a test object to the Windows Clipboard for subsequent insertion elsewhere in the Test Builder. This menu item is available only when a project is open and only if a test group, test, question, answer, weight, scale, or interpretation object is selected. |
| CTRL-P | Press the CTRL and P keys simultaneously | Paste a test object if it was previously cut or copied to the Windows Clipboard. This menu item is available only when a project is open and only if an appropriate object is selected in the Test Builder (for example, a test can be pasted only into a test group, etc.). |
| CTRL-X | Press the CTRL and X keys simultaneously | Cut a test object to the Windows Clipboard for subsequent insertion elsewhere in the Test Builder. This menu item is available only when a project is open and only if a test group, test, question, answer, weight, scale, or interpretation object is selected. |
| Home | Press the Home key | Go to the very first node in the Test Builder node tree. |
| End | Press the End key | Go to the last node currently expanded in the Test Builder node tree. |
| Page Down | Press the PgDn key | Go to the next node one page below the selected node (one page is equal to the number of nodes currently displayed in the tree), or to the last open node if there are only a few objects. |
| Page Up | Press the PgUp key | Go to the previous node one page above the selected node (one page is equal to the number of nodes currently displayed in the tree), or to the first node if there are only a few objects. |
| SHIFT-Del | Press the SHIFT and Del keys simultaneously | Delete the test element represented by the selected node in the node tree. This key combination is available only if the selected tree node represents one of the direct test elements. |
| SHIFT-Enter | Press the SHIFT and Enter keys simultaneously | Edit the test element represented by the selected node in the node tree. This key combination is available only if the selected tree node represents one of the direct test elements. |
| SHIFT-Ins | Press the SHIFT and Ins keys simultaneously | Create a new test element that is a child of the element corresponding to the selected node in the node tree. This key combination is available only if the selected tree node represents one of the direct test elements. |
| Up Arrow | Press the Up Arrow key | Go to the node above the selected node that is currently shown in the node tree. |
| Left Arrow | Press the Left Arrow key | Expand the child elements of the selected node if they are hidden, or go to the first child node if they are already expanded. |
| Down Arrow | Press the Down Arrow key | Go to the node below the selected node that is currently shown in the node tree. |
| Right Arrow | Press the Right Arrow key | Hide the child elements of the selected node if they are expanded, or go to the parent node if they are hidden. |
Test Player keyboard shortcuts assist with launching tests and performing testing procedures and operate within the active child window of a running test.
Table 15. Test Player keyboard shortcuts
| Keyboard shortcut | Action | Description |
| ENTER | Press the ENTER key | Select or deselect the current answer if the current element on the test screen is an answer. If the current element is a navigation button, move to another test screen according to that button. |
| TAB | Press the keyboard Tab key | Make the next answer or navigation button the current element on the test screen. If the last navigation button has been reached, focus moves to the first answer for the current question. |
| SHIFT-B | Press the SHIFT and B keys simultaneously | Go to the previous test question according to the predefined question order. This keyboard shortcut is available only if backward movement through questions is permitted in the current test. |
| SHIFT-N | Press the SHIFT and N keys simultaneously | Go to the next test question according to the predefined question order. |
| SPACE | Press the Space key | This key performs the same action as the ENTER key. |
| Up Arrow | Press the Up Arrow key | Go to the previous answer. If the first answer to the question has been reached, go to the last answer. |
| Left Arrow | Press the Left Arrow key | This key performs the same action as the Up Arrow key. |
| Down Arrow | Press the Down Arrow key | Go to the next answer. If the last answer to the question has been reached, go to the first answer. |
| Right Arrow | Press the Right Arrow key | This key performs the same action as the Down Arrow key. |
4.5.Context Menus
Some graphical user interface elements have context menus that simplify access to available Sindy functions. The context menu of an interface element opens when the right mouse button is clicked while the pointer is over that element. Separate context menus are defined for nodes of the Test Builder, child windows of the Test Player, and the test object arrangement window.
The Test Builder context menu provides quick access to operations on individual nodes.
Table 16. Context menu for Test Builder nodes
| Context menu item | Description |
| Create | Create a new test object in the Test Builder as a child of the object represented by the selected node. The name and availability of this context menu item are determined by the type of the selected node in the Test Builder. |
| Edit | Edit an existing test object represented by the selected node in the Test Builder. The name and availability of this context menu item are determined by the type of the selected node in the Test Builder. |
| Delete | Delete an existing test object represented by the selected node in the Test Builder. The name and availability of this context menu item are determined by the type of the selected node in the Test Builder. |
| Arrange Objects… | Change the order of test objects in the Test Builder that are children of the selected node object. The name and availability of this menu item are determined by the type of the selected node. |
| Delete All “Child Objects” | Delete all test objects in the Test Builder that are children of the selected node element. The name and availability of this menu item are determined by the type of the selected node. |
| Run Test | Run a test in a child window of the Test Player. This menu item is available if any test is currently selected in the Test Builder. |
The context menu for Test Player child windows makes it possible to perform program functions during testing and create reports when testing is complete.
Table 17. Context menu for Test Player child windows
| Context menu item | Description |
| Next | Go to the next test question according to the predefined question order. |
| Close | Close the current Test Player window, completely terminating the testing procedure. |
| Back | Go to the previous test question according to the predefined question order. This context menu item is available only if backward movement through questions is permitted in the current test. |
| Stop | This function will be implemented in future releases of Sindy. |
| Pause | This function will be implemented in future releases of Sindy. |
| Go To | This menu item can contain additional child menu items, each corresponding to a particular test question. This menu item is used only if the test allows free navigation to any question. |
| Show Test Protocol | Create the Test Protocol. This context menu item is available only on the final testing screen if all questions requiring an answer have been answered. |
| Show Test Results | Create the Test Results Report. This context menu item is available only on the final testing screen if all questions requiring an answer have been answered. |
| Continue | This function will be implemented in future releases of Sindy. |
| Expand to Full Screen | Expand the child window of the running test to full screen. This context menu item is available only for Test Player child windows. |
| Restore to Program | Restore the expanded running-test window to the size of a Test Player child window. This context menu item is available only for a running-test window that has been expanded to full screen. |
The context menu for the test object arrangement window provides additional access to program operations that can be used to change the order of these objects.
Table 18. Context menu for the test object arrangement window
| Context menu item | Description |
| Select All Objects | Select all objects displayed in the arrangement window at once. |
| Deselect All Objects | Deselect all objects displayed in the arrangement window at once. |
| Move All to End | Move all selected objects to the end of the list while preserving their current order relative to one another. |
| Move All to Beginning | Move all selected objects to the beginning of the list while preserving their current order relative to one another. |
| Move All One Position Up | Move each selected object one position up while preserving the current order of the selected objects relative to one another. |
| Move All One Position Down | Move each selected object one position down while preserving the current order of the selected objects relative to one another. |
4.6.Tooltips
A number of Sindy graphical user interface elements have so-called tooltips that display additional information about the purpose of these elements.
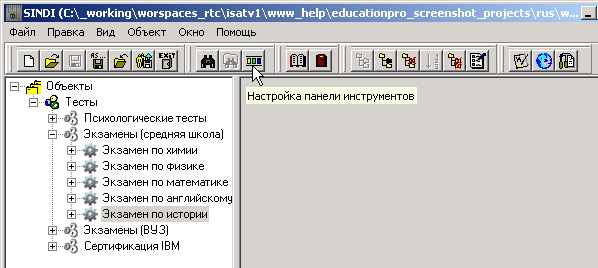
To display such a tooltip, move the mouse pointer over the corresponding user-interface element (for example, a toolbar button) and hold the pointer over the element for a few moments. The tooltip appears for only a few seconds, but this is usually sufficient to read its contents and obtain information about the element’s function.
Note that subsequent movement of the mouse pointer hides the tooltip before it would otherwise disappear.
4.7.“Drag & Drop” Operations
Sindy supports dragging objects in the node tree of the Test Builder. This significantly simplifies arranging a small group of objects.
Keep in mind the following restrictions on this operation:
- Only one object can be moved at a time using “Drag & Drop”
- Objects can be dragged only within the same parent object
When a test object is dragged, the mouse pointer changes. If the mouse pointer looks like 
, the selected object can be moved to that location. If the pointer looks like  , the object cannot be moved to that location.
Using “Drag & Drop”, you can move:
- A test group within the “Tests” node
- A test within a particular test group
- A scale within the “Scales and Interpretations” node of a particular test
- An interpretation within a particular scale
- A question within the “Questions and Answers” node of a particular test
- An answer within a particular question
- A weight within a particular answer
To drag a test object, perform the following actions:
- Left-click the node of the object to be moved in the Test Builder node tree
- Without releasing the left mouse button, begin moving the selected object to a new position (note the change in the mouse pointer)
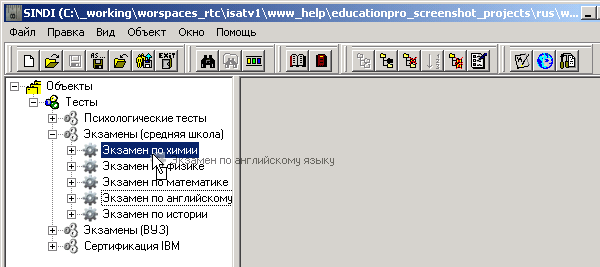
- Select the new position for the node being moved and release the left mouse button over it
Note that the object being moved takes the place of the object over which the mouse button is released. That object and all subsequent objects within the parent node are shifted down by one position.
Moving a test object to the end of a list can be somewhat more difficult. This is done in two stages: first, drop the object being moved onto the last object within the parent node (the moved object then becomes second-to-last), and then move the last object onto the position of the second-to-last object (the two last objects swap positions and the object being moved becomes the last one).
4.8.Data Exchange via the Windows Clipboard
The Clipboard is an intermediate data store used by Sindy to exchange data with external applications and also to move or copy test objects within Sindy itself.
Standard Clipboard operations such as cut, copy, and paste are used. When cutting, the source information is placed on the Windows Clipboard and is removed from its original location after a subsequent paste operation. Copying is similar to cutting, but the source information is not removed and is effectively duplicated after pasting. Pasting itself makes it possible to insert data from the Clipboard into a new destination in the program.
Data-exchange operations are available in Sindy text input fields. For example, you can cut or copy text data from the Internet Explorer web browser into the “Description” field of a particular test group.
In addition, when developing tests in Sindy, Clipboard operations can be used on nodes of the Test Builder. This can be useful for quickly populating a project with similar test objects. For example, if a test contains several dozen questions and each question has only the two answers “Yes” and “No”, it is sufficient to create these answers for only one question and then reproduce them for the others by copying them in the original question and pasting them into all the new questions.
An object from the Clipboard can be pasted an unlimited number of times. When information is cut or copied to the Clipboard, its previous contents are completely replaced by the new contents.
To perform data-exchange operations through the Windows Clipboard, you can use the main and context menu commands (“Cut”, “Copy”, and “Paste”), as well as keyboard shortcuts (CTRL-X, CTRL-C, and CTRL_V).